


Tuesday, October 16, 2012
CTMH Alcohol Ink Markers
Our markers come in all 40 exclusive colors we carry along with a complimentary marker in either a darker or lighter shade for one low price!!! Each set of 2 markers is just $5.95. Now that is real value! Get yours today.
Monday, October 15, 2012
Shake Your Bootie...err Card!
I have to share a wonderful Christmas card made by one my talented daughters, Shandel. She decided to try her hand at a shaker card and what a beautiful job she did!
 The shaker card is only limited by your imagination. It can be any shape or size as long as it fits over top of your card base.
To make a shaker card you will need your card, a shape with the center cut out, double sided foam tape, shaker material and, clear plastic to keep the material inside. Shandel used CTMH Partridge & Pear B&T paper, Cranberry and New England Ivy cardstock, CTMH foam tape, pretty red stars she picked up at Michaels and the clear window was cut from a sheet of transparency paper. This you can get at any office supply store. If you don't want to leave the comfort of your home you can also cut a piece from a clear plastic bakery container. Make sure you enjoy the baked goods while you craft!
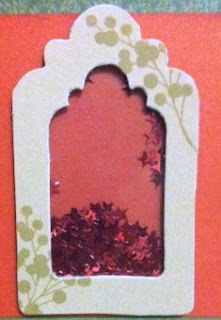
The easiest way to make your shaker is from the outside in. First cut your shape and a piece of transparancy paper slightly smaller than your shape, making sure it fully covers the opening in the shape. Embellish the shape the way you want it. Shandel used the CTMH Merry & Bright (C1510) stamp set to add holly berries.
Lay the shape face down and adhere the transparency to the back side of the shape. Put the foam tape all the way around the shape, making sure there are no gaps or else you will lose your shaker material! I like to cut smaller pieces especially when going around corners. Fill the shaker at this point before removing the second covering from the foam tape so that you don't get stray material on the sticky parts.
The last part is the tricky part - centering your card over the shaker to adhere it together. I usually stand at a height where I can look sideways between the layers as I'm putting them together. This way I can "see" where the shaker needs to be. Viola! Shaker card made!!
Sunday, October 14, 2012

Here is how to get started with Cricut® Craft Room:
- Create a FREE account in a few easy steps.
- Download and run the application for PC or MAC, depending on the type of computer you use.
- Connect your Cricut® machine to your computer using a Type B USB cable. (Note: For more info on this type of cable, see your Cricut® user’s guide or your local electronics store.) Once you have connected your computer to your Cricut® machine, the “Load Mat” button is the only button you will ever need to push on your machine in the entire process. Cricut® Craft Room will do everything else for you.
- Once inside the application, choose the type of Cricut® machine you own.
- Insert your Close To My Heart Art Philosophy or Artiste cartridge into your Cricut® machine.
- In the lower left portion of the application there is a tab that is labeled “Images/Cartridges.” Select “All Cartridges” from the dropdown menu. (Note: You must choose a cartridge that you own. You can also purchase individual images from the Cricut® store.)
- Scroll to find the Close To My Heart Art Philosophy or Close To My Heart Artiste cartridges you own.
- The virtual mat in Cricut® Craft Room is just like the mat you’ll load into your machine. And, it is oriented the same way that you will load your mat into the machine, with the arrow at the top.
- To drag an image to the mat, simply click on the image in the image selection tool box and move it to the mat.
- Once the image is on the virtual mat, you can adjust the placement by clicking on the image and moving it to any location on the mat.
- Now that you know the basics, you can start creating and exploring the possibilities!

Follow these steps to create the negative space on a card base, like you see on this Cheer Up card, featuring images from the Art Philosophy cartridge:
- Select the “Card” tab in the Art Philosophy images. Find the card base you prefer and drag it onto the mat. (We used Square 1 for the Cheer Up card.) The image will be cut in the exact direction and location that you place it on the virtual mat. At the top of the screen, or at the left under the “Shape Properties” tab, you’ll see size boxes. Enter the width and height for your shape. This is the size it will be cut on the machine, regardless of what size your machine indicates on the flip screen.

- Choose an image to cut out of your card front. We have chosen a butterfly by going to the Basics tab, clicking the “Show Shift/Lock Images” at the bottom, and then selecting the butterfly. Drag the image to the right side of the card base, position it, and alter the size, as desired. Once the image is in place, you will see a cut-out image in its place. This Weld feature is automatically on unless you disable it, and allows you to see how the card base will look with your images cut out.

- Select another image, drag it to the card base, and position it how you’d like it. Continue adding images to the card base, if desired.

- To cut your finished artwork, load the mat into your Cricut® machine and insert the corresponding cartridge. Next, press the green Cut button at the top of the computer screen and follow the prompts. The machine will cut the shapes as you have prepared them in Craft Room. If more than one cartridge shape has been added to the project, the machine and screen will prompt you with instructions.

Here are so more artwork examples that have been made using Cricut® Craft Room software. Follow the instructions below to learn some more fun tricks we used in creating this artwork.
Birthday Greetings card

Here’s how to create the bracket frame as shown in this Birthday Greetings card:
- Drag a card base from Art Philosophy cartridge and size it to be 9" wide and 4½" high.
- Add a 1½" bracket frame (from the Basic tab) to the center of the right side of the card. So far, all of the shapes have been placed in Layer 1. You can add additional layers using the Layer feature located toward the top of the screen, directly above the mat. Each Layer will be cut from a separate sheet of paper and is indicated by a different color on the screen. Using the Layer feature allows you to fully design your Cricut® shapes before cutting any pieces.
- Add a second Layer by clicking the plus sign. Click and hold the Layer 2 tab and drag the tab to the left so it is first in the row. This allows you to see the second Layer on top of the first so you can visualize your finished project. Drag a 3" bracket frame to the card base and position it over the 1½" frame. Then, still using Layer 2, add a 1½" bracket frame in the center of the 3" frame.
- Maneuver the Layer 2 frames so that they perfectly line up with the Layer 1 frame. Use your keyboard arrows for exactness.
- Cut the pieces following the prompts on the computer screen and Cricut® machine. Layer 2 will be cut first, so be sure to load that paper first. Then load a new sheet of paper for the Layer 1 pieces.
- Embellish the card as desired.
All Boy page

Want to create a border that spans the entire length of your 12" page? It’s easy!
- In Craft Room, change the mat size to 12" x 24" under Machine & Mat tab on the left of the screen.
- Drag your selected border to the mat and rotate it so it is vertical.
- Change the height of the border to 12". It will automatically change the width proportionally unless you click the aspect ratio button between the width and height measurements.
- Whether you have a 12" × 24" mat or a 12" × 12" mat, you can use this function with a 12" × 12" piece of paper. Simply place the border as close to the top of the Craft Room mat as possible, but not exactly flush with the top.

- Cut the piece following the prompts on the computer screen and Cricut® machine.
- Drag your letters to the mat
- Overlap portions of each letter to connect them
- Use the Weld feature to join the letters together seamlessly.
- Cut the piece following the prompts on the computer screen and Cricut® machine.
Monday, October 8, 2012
First Time Fantastic
Happy Thanksgiving Everyone!!!!
My friend, Erica has once again been busy crafting away and has allowed me to share her creation with you.
This time she decided to do some firsts - using a clear card, rock & roll technique, and the sponge dauber inking technique.She also used a couple of simple but effective distressing techniques - tearing and sponging. These are each simple techniques, yet by combining them she has created an entire scene - Great Job Erica!
The inside of her card shows how tearing creates a dramatic definition between layers of paper. It truly gives the impression of a rolling landscape with a warm summer sun beaming down. Sponging the edges creates a lighter section on the center drawing the eyes to it. She truly made this look like sky.
Erica used the Rock & Roll technique on her stamp. By inking up with Autumn Goldrush first then "rolling around" the outer edge of the stamp in Sorbet she achieved a subtle color change. Notice how the sun looks brighter in the center. You can see the first stamp in straight Autumn Goldrush peeking out from underneath which gives the element a 3D appearance.
In looking at this, I imagined a myself laying in the grass next to a field of orange flowers under a hot summer sun, glass of cold ice tea in one hand and a good book in the other.
Clear cards can be difficult to work with the first few times. You are creating one image out of two layers. Erica managed to create 2 separate yet equally wonderful themes to her card. All this on her first attempt!
The front of her card has some wonderful features.She combines ribbon with buttons to create a wonderful banner that ends with the pinwheel sun from the bottom layer.
She hid the inner features by using a straight line on her B&T paper set a bit higher than the one underneath.
The sentiment is where Erica put her creativity to work! She watched the CTMH Sponge Dauber video, liked the technique, but didn't have the daubers. She used the tape off technique to create the same effect. The combination of Smokey Plum, Pear and Goldrush look stunning together - way to go Erica!
As you can see by the closed card, it has a completely different feel to it than the open view.
What a wonderful "Firsts"creation!!
Erica, you now have a gift certificate for a free set of daubers with your next order!!
Who's next for a gift certificate? Watch the CTMH Sponge Dauber Video, create a project using the technique and email me your creation. That's it - your gift certificate is yours!
Send your pics to mizzchristine@shaw.ca
Saturday, October 6, 2012
World Card Making Day meets CTMH Fall Favorites
Happy World Card Making Day!
Here is my card to celebrate the day and Thanksgiving.

I used the new CTMH Saddle cardstock as the base paper which coordinates well with the Cocoa card stock. The B&T is from a retired paper pack.
You may recognize the September SOTM - Fall Favorites image. I just adore this little scarecrow. I used watercolor pencils to color him in. The sentiment is from a retired CTMH stamp set D1175 Autumn's Gifts.
The fence is Martha Stewart's bat fence but I snipped off the bat wings to make this into a wrought iron fence. The ribbons are again CTMH - I am in absolute love with our new burlap ribbon!
Alright, I showed you mine now you show me yours!! Make a card for World Card Making Day!!
Subscribe to:
Posts (Atom)
