Sunday, November 18, 2012

Other Crafts...or why my posts are so random!

Ok, my apologies for no paper projects lately. I am otherwise occupied BUT am still crafting...just with fabric this time. My second grandbaby is due to arrive in early December and I am scrambling between working full time and starting university to make some special things for baby and parents.

Project # 1 - This project was a better-have-an-alternative-plan project. You will see a little further down why!
I found a wonderful YouTube video series that makes these disposable diaper "cakes" without waste. Nothing in this glued down so the whole item can be torn apart and used for baby. The only throw-away part are the "axles" which are cardboard tubes from wrapping paper. Here is the link to Thom's Facebook account which will also direct you to her blog and YouTube channel:

Here is a link to Thom's Crafts and Treats Facebook page:
http://www.facebook.com/pages/Thoms-Crafts-and-Treats/452887034737446

Project # 2 - This is the original project which is quickly falling behind schedule - hence the above project. The internet is chock full of different free diaper patterns so I settle on this one...for now.
The outer shell is made from PUL ( do not ask for the technical terminology!) and the inner layer is made using microfleece. PUL is a fabric that provides a waterproof barrier so that you eliminate the need for outer pants. When used as the outer layer of fabric it's a cloth replacement for the disposable diaper! LOVE IT!

This first one has too large of legholes for a newborn so I made adjustments in diaper # 2.
Number 2 is closer to what I want to see in a newborn diaper so I will play with it some more and post number 3 when it is done.

Happy Crafting!!!

Sunday, November 11, 2012

Honor Our Soldiers...Always


Reposted From YouTube:
" On November 11, 1999 Terry Kelly was in a drug store in Dartmouth, Nova Scotia. At 10:55 AM an announcement came over the stores PA asking customers who would still be on the premises at 11:00 AM to give two minutes of silence in respect to the veterans who have sacrificed so much for us.

Terry was impressed with the stores leadership role in adopting the Legions two minutes of silence initiative. He felt that the stores contribution of educating the public to the importance of remembering was commendable.

When eleven oclock arrived on that day, an announcement was again made asking for the two minutes of silence to commence. All customers, with the exception of a man who was accompanied by his young child, showed their respect.

Terrys anger towards the father for trying to engage the stores clerk in conversation and for setting a bad example for his child was channeled into a beautiful piece of work called, A Pittance of Time. Terry later recorded A Pittance of Time and included it on his full-length music CD, The Power of the Dream.

Thank You to the Royal Canadian Legion Todmorden Branch #10 and Woodbine Height Branch #2 for their participation in the Video. "

Please visit www.terry-kelly.com


I would like to thank all the men and women who sacrificed so much so that I can sit here posting to my blog today in FREEDOM. I am forever grateful to the soldiers who gave their lives for me. I am forever grateful to the Families of these soldiers who lost their own so that I can post these words freely today.

Please join me in my gratitude and make sure that those around you ALWAYS remember what Remembrance Day (Canada) and Veterans Day (USA) means and ALWAYS honors those who gave their lives for us.

Saturday, November 3, 2012

November Specials


During the month of November if you order $50 AND buy the stamp of the month for $5.....drum roll.......you get any stamp set of your choice (size A-E or M) for 50% off! 
 
 
Here is what the full set images looks like. 

 
It's only available Nov. 1-30, 2012 so click here to get yours now! The stamp set is $17.95 but you can get it for only $5 with a $50 min. order! 

Tuesday, October 16, 2012

CTMH Alcohol Ink Markers


Our markers come in all 40 exclusive colors we carry along with a complimentary marker in either a darker or lighter shade for one low price!!! Each set of 2 markers is just $5.95. Now that is real value! Get yours today.

Monday, October 15, 2012

Shake Your Bootie...err Card!

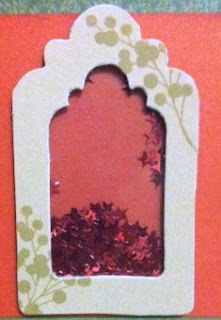
I have to share a wonderful Christmas card made by one my talented daughters, Shandel. She decided to try her hand at a shaker card and what a beautiful job she did!

The shaker card is only limited by your imagination. It can be any shape or size as long as it fits over top of your card base.

To make a shaker card you will need your card, a shape with the center cut out, double sided foam tape, shaker material and, clear plastic to keep the material inside. Shandel used CTMH Partridge & Pear B&T paper, Cranberry and New England Ivy cardstock, CTMH foam tape, pretty red stars she picked up at Michaels and the clear window was cut from a sheet of transparency paper. This you can get at any office supply store. If you don't want to leave the comfort of your home you can also cut a piece from a clear plastic bakery container. Make sure you enjoy the baked goods while you craft!


The easiest way to make your shaker is from the outside in. First cut your shape and a piece of transparancy paper slightly smaller than your shape, making sure it fully covers the opening in the shape. Embellish the shape the way you want it. Shandel used the CTMH  Merry & Bright (C1510)  stamp set to add holly berries.

Lay the shape face down and adhere the transparency to the back side of the shape. Put the foam tape all the way around the shape, making sure there are no gaps or else you will lose your shaker material! I like to cut smaller pieces especially when going around corners. Fill the shaker at this point before removing the second covering from the foam tape so that you don't get stray material on the sticky parts.

The last part is the tricky part - centering your card over the shaker to adhere it together. I usually stand at a height where I can look sideways between the layers as I'm putting them together. This way I can "see" where the shaker needs to be. Viola! Shaker card made!!

Sunday, October 14, 2012

If you love your Cricut® machine, then you are going to adore all of the fabulous things you can do with Close To My Heart Cricut® cartridges in the Cricut® Craft Room. Create layers, cut negative space in the shape of your choice, make borders, and link elements together for a connected look. It’s easy! We’ll show you how.

Here is how to get started with Cricut® Craft Room:
  1. Create a FREE account in a few easy steps.
  2. Download and run the application for PC or MAC, depending on the type of computer you use.
  3. Connect your Cricut® machine to your computer using a Type B USB cable. (Note: For more info on this type of cable, see your Cricut® user’s guide or your local electronics store.) Once you have connected your computer to your Cricut® machine, the “Load Mat” button is the only button you will ever need to push on your machine in the entire process. Cricut® Craft Room will do everything else for you.
  4. Once inside the application, choose the type of Cricut® machine you own.
  5. Insert your Close To My Heart Art Philosophy or Artiste cartridge into your Cricut® machine.
  6. In the lower left portion of the application there is a tab that is labeled “Images/Cartridges.” Select “All Cartridges” from the dropdown menu. (Note: You must choose a cartridge that you own. You can also purchase individual images from the Cricut® store.)
  7. Scroll to find the Close To My Heart Art Philosophy or Close To My Heart Artiste cartridges you own.
  8. The virtual mat in Cricut® Craft Room is just like the mat you’ll load into your machine. And, it is oriented the same way that you will load your mat into the machine, with the arrow at the top.
  9. To drag an image to the mat, simply click on the image in the image selection tool box and move it to the mat.
  10. Once the image is on the virtual mat, you can adjust the placement by clicking on the image and moving it to any location on the mat.
  11. Now that you know the basics, you can start creating and exploring the possibilities!

Follow these steps to create the negative space on a card base, like you see on this Cheer Up card, featuring images from the Art Philosophy cartridge:
  1. Select the “Card” tab in the Art Philosophy images. Find the card base you prefer and drag it onto the mat. (We used Square 1 for the Cheer Up card.) The image will be cut in the exact direction and location that you place it on the virtual mat. At the top of the screen, or at the left under the “Shape Properties” tab, you’ll see size boxes. Enter the width and height for your shape. This is the size it will be cut on the machine, regardless of what size your machine indicates on the flip screen.

  1. Choose an image to cut out of your card front. We have chosen a butterfly by going to the Basics tab, clicking the “Show Shift/Lock Images” at the bottom, and then selecting the butterfly. Drag the image to the right side of the card base, position it, and alter the size, as desired. Once the image is in place, you will see a cut-out image in its place. This Weld feature is automatically on unless you disable it, and allows you to see how the card base will look with your images cut out.

  1. Select another image, drag it to the card base, and position it how you’d like it. Continue adding images to the card base, if desired.

  1. To cut your finished artwork, load the mat into your Cricut® machine and insert the corresponding cartridge. Next, press the green Cut button at the top of the computer screen and follow the prompts. The machine will cut the shapes as you have prepared them in Craft Room. If more than one cartridge shape has been added to the project, the machine and screen will prompt you with instructions.

Here are so more artwork examples that have been made using Cricut® Craft Room software. Follow the instructions below to learn some more fun tricks we used in creating this artwork.

Birthday Greetings card


Here’s how to create the bracket frame as shown in this Birthday Greetings card:
  1. Drag a card base from Art Philosophy cartridge and size it to be 9" wide and 4½" high.
  2. Add a 1½" bracket frame (from the Basic tab) to the center of the right side of the card. So far, all of the shapes have been placed in Layer 1. You can add additional layers using the Layer feature located toward the top of the screen, directly above the mat. Each Layer will be cut from a separate sheet of paper and is indicated by a different color on the screen. Using the Layer feature allows you to fully design your Cricut® shapes before cutting any pieces.
  3. Add a second Layer by clicking the plus sign. Click and hold the Layer 2 tab and drag the tab to the left so it is first in the row. This allows you to see the second Layer on top of the first so you can visualize your finished project. Drag a 3" bracket frame to the card base and position it over the 1½" frame. Then, still using Layer 2, add a 1½" bracket frame in the center of the 3" frame.
  4. Maneuver the Layer 2 frames so that they perfectly line up with the Layer 1 frame. Use your keyboard arrows for exactness.
  5. Cut the pieces following the prompts on the computer screen and Cricut® machine. Layer 2 will be cut first, so be sure to load that paper first. Then load a new sheet of paper for the Layer 1 pieces.
  6. Embellish the card as desired.

All Boy page


Want to create a border that spans the entire length of your 12" page? It’s easy!
  1. In Craft Room, change the mat size to 12" x 24" under Machine & Mat tab on the left of the screen.
  2. Drag your selected border to the mat and rotate it so it is vertical.
  3. Change the height of the border to 12". It will automatically change the width proportionally unless you click the aspect ratio button between the width and height measurements.
  4. Whether you have a 12" × 24" mat or a 12" × 12" mat, you can use this function with a 12" × 12" piece of paper. Simply place the border as close to the top of the Craft Room mat as possible, but not exactly flush with the top.

  1. Cut the piece following the prompts on the computer screen and Cricut® machine.
To create the title with the letters joined together to form one piece instead of individually cut letters…
  1. Drag your letters to the mat
  2. Overlap portions of each letter to connect them
  3. Use the Weld feature to join the letters together seamlessly.
  4. Cut the piece following the prompts on the computer screen and Cricut® machine.
There are so many possibilities to explore in the Cricut® Craft Room using the versatile Art Philosophy and Artiste cartridges from Close To My Heart! If you have any questions about using Cricut® Craft Room, visit www.cricut.com where a Cricut® employee will be glad to help you. Be sure to get your Art Philosophy and Artiste Cricut® cartridges today in order to create with them in this new and exciting environment!

Monday, October 8, 2012

First Time Fantastic

Happy Thanksgiving Everyone!!!!

My friend, Erica has once again been busy crafting away and has allowed me to share her creation with you.
This time she decided to do some firsts - using a clear card, rock & roll technique, and the sponge dauber inking technique.She also used a couple of  simple but effective distressing techniques - tearing and sponging. These are each simple techniques, yet by combining them she has created an entire scene - Great Job Erica!

The inside of her card shows how tearing creates a dramatic definition between layers of paper. It truly gives the impression of a rolling landscape with a warm summer sun beaming down. Sponging the edges creates a lighter section on the center drawing the eyes to it. She truly made this look like sky.

Erica used the Rock & Roll technique on her stamp. By inking up with Autumn Goldrush first then "rolling around" the outer edge of the stamp in Sorbet she achieved a subtle color change. Notice how the sun looks brighter in the center. You can see the first stamp in straight Autumn Goldrush peeking out from underneath which gives the element a 3D appearance.

In looking at this, I imagined a myself laying in the grass next to a field of orange flowers under a hot summer sun, glass of cold ice tea in one hand and a good book in the other.


Clear cards can be difficult to work with the first few times. You are creating one image out of two layers. Erica managed to create 2 separate yet equally wonderful themes to her card. All this on her first attempt!

The front of her card has some wonderful features.She combines ribbon with buttons to create a wonderful banner that ends with the pinwheel sun from the bottom layer.

She hid the inner features by using a straight line on her B&T paper set a bit higher than the one underneath. 

The sentiment is where Erica put her creativity to work! She watched the CTMH Sponge Dauber video, liked the technique, but didn't have the daubers. She used the tape off technique to create the same effect. The combination of Smokey Plum, Pear and Goldrush look stunning together - way to go Erica!

As you can see by the closed card, it has a completely different feel to it than the open view. 

What a wonderful "Firsts"creation!!

Erica, you now have a gift certificate for a free set of daubers with your next order!!

Who's next for a gift certificate? Watch the CTMH Sponge Dauber Video, create a project using the technique and email me your creation. That's it - your gift certificate is yours!

Send your pics to mizzchristine@shaw.ca

Saturday, October 6, 2012

World Card Making Day meets CTMH Fall Favorites

Happy World Card Making Day!
Here is my card to celebrate the day and Thanksgiving.

This is my first easel card and I was amazed at how easy they are to make. Mine is 4.5" x 4.5".
I used the new CTMH Saddle cardstock as the base paper which coordinates well with the Cocoa card stock. The B&T is from a retired paper pack.

You may recognize the September SOTM - Fall Favorites image. I just adore this little scarecrow. I used watercolor pencils to color him in. The sentiment is from a retired CTMH stamp set D1175 Autumn's Gifts.

The fence is Martha Stewart's bat fence but I snipped off the bat wings to make this into a wrought iron fence. The ribbons are again CTMH - I am in absolute love with our new burlap ribbon!

Alright, I showed you mine now you show me yours!! Make a card for World Card Making Day!!

Friday, September 21, 2012

Creative Talent Featuring Erica

I met Erica through my daughter, Shandel, a few years back. She has the most bubbly personality of anyone I have the pleasure of knowing. She is intelligent, hard working, honest, and has a keen eye for photography. Now, Erica was a self-proclaimed "non-crafty type person". She relayed to me that she didn't really care for anything girly and certainly was not a scrapbooker.I took her at her word and instantly loved her as part of my own "brood".

One weekend, Shandel was having a CTMH home gathering that always includes a small project and Erica decided to attend even though she was sure this was not her thing. Her loyalty of friendships is what bought her out that day. I am so thrilled to know that that event sparked something in Erica she never knew she had - a love of paper crafting. Since then, she has created many wonderful projects and her increasing "eye" for pattern and structure is awesome to watch.

I  have to share Erica's beautiful creations with you all.


Don't you agree that is is DEFINITELY not the work of a "non crafty type person"? I think there is an amazing amount of talent in this wonderful person known as Erica.

Sunday, September 9, 2012

Paper Play Party Reminder

Don't forget to mark your calendars for my Paper Play Party!!

 What is a Paper Play Party you may be wondering! It is a time to get away from the hustle and bustle of our daily lives and enjoy some down time. It is a means to relax, visit, craft, and get FREE stuff! Unlike the traditional "Club" where you are committed for a certain time and a set dollar amount, a Paper Play Party is a no commitment fun time to get away from it all. How can I get free stuff this way? Come and find out!

I'm opening my home to YOU on September 22 at 1:00 pm
9727 - 109 Street, Westlock

Our first project will be using the September Stamp of the Month - Fall Favorites S1209. Isn't he adorable?


Call me at 780-307-8586 or email me at mizzchristine@shaw.ca to RSVP

Tuesday, September 4, 2012

My Acrylix Stamp Sets - Clearly The Best!

Close To My Heart is online at My Craft Channel

Here is the first of a series of videos that will be available. This one shows you the advantage of using our MyAcrylix clear stamps. They really are "Clearly The Best"!!


Head over to the site and sign up for free!!

Monday, September 3, 2012

WOTG Kits Go A Looooooong Way!

Our Workshops On The Go (WOTG) kits are perfect for creating gorgeous pages in a minimal amount of time. Each kit comes with a full paper packet, an exclusive stamp set, at least 2 accessories, and full color instructions. In next to no time you have a 2 page layout ready to add your photos to. Pssst - don't forget to add journaling. Your ancestors will appreciate your words.

The Avonlea WOTG has a quick and easy layout, perfect for those few stolen moments of crafting time.
 Don't have the pictures printed yet or unsure just what event you want to highlight with this layout? No worries! Just cut scrap card stock to the picture sizes and adhere with re-positionable glue as I did in my sample above.

I used our Bonding Memories glue pen for this. This dual action glue pen is a must for your work table! Apply the glue and adhere your pieces immediately for a permanent hold. Let the glue dry BEFORE adhering your pieces and it becomes re positionable! One more tip before we move on - this glue is excellent to use on your worn out Cricut mats to make them sticky again. Simply wash your mat in warm slightly soapy water, rinse off and air dry. When dry, apply Bonding Memories Glue and let it dry. Viola!

Avonlea comes with our gorgeous Parlour Velvet Rub-Ons and Opaques in Mocha. My picture does not do justice to these products. It is soft, velvety and raised to add texture to your page while the opaques add a delicate shimmer.
 
 Now, I aways say that there are no mistakes in scrapbooking - only opportunities for creativity. My opportunity came when I glued down the first tiny strip along the top edge of the first page. I didn't measure quite right and ended up 1/2" too high. Nothing to fuss about! I just made sure that I lined up the strips on the right hand page to match and used one of the tiny stamps in the set to fill in the area. Tah-Dah! Looks like I did this on purpose. Shhhhhh I won't tell if you don't.


Also included in the WOTG instructions is a sample of a second layout and an extra project (not shown in this post). Here is the suggested second layout:
For the cutting instructions and directions on these secondary layouts, you will need our How-To books. Unfortunately we don't carry these books anymore - not that they weren't just the most amazing instructional books on the planet! CTMH only had exclusive rights for a certain amount of time and now you can find them at Chapters and Michaels.We have a new How-To book called "Make It from Your Heart" vol.1. This book is filled with all the primary WOTG layouts plus more!

When you are the FIRST person in any given month to book your WOTG  with me, you and your guests get an extra project just from me. It is my way of Thanking my Friends and also a way to show you how to get the most out of your kit. This month, Erica and her guests will be making this beautiful card.


Now, you are probably thinking that $29.95 is steep for a kit that makes only 2 2-page layouts. Think again! Here are the projects I created with my Avonlea WOTG kit:

Look how much product I have left over to continue to craft with:
2 Full sheets and 2 pieces of card stock; 2 full sheets and a pile of pieces of B&T paper; 3/4's of a pack of Opaques; 2/3's of a pack of Velvet Rub-ons; a C-size stamp set to use forever!!! This will keep me busy for hours. I say that this is good value for your money.


Saturday, September 1, 2012

Happy September Everyone!

Where has the summer gone? I know mine was spent doing a ton of visiting with family and friends. We tended the garden, made a couple trips out to the local lake, swam in our free pool - Thank You Keren! What better way is there to have time fly?

As I look out my window this morning I see a large patch of yellow leaves on the tree across the street. Sigh! Fall is creeping up on us with all it's natural glory. Crisp leaves will start to flutter off the trees, grass will crunch under our feet as we walk, and the final sign will be the honking geese flying to southern destinations.

I plan on celebrating this time of the year with some crafting and I want to invite YOU to join me! It is well time to have a Paper Play Party! Let's get together for some tasty beverages, good company, and fun paper crafts.

 What is a Paper Play Party you may be wondering! It is a time to get away from the hustle and bustle of our daily lives and enjoy some down time. It is a means to relax, visit, craft, and get FREE stuff! Unlike the traditional "Club" where you are committed for a certain time and a set dollar amount, a Paper Play Party is a no commitment fun time to get away from it all. How can I get free stuff this way? Come and find out!

I'm opening my home to YOU on September 22 at 1:00 pm
9727 - 109 Street, Westlock

Our first project will be using the September Stamp of the Month - Fall Favorites S1209. Isn't he adorable?


Call me at 780-307-8586 or email me at mizzchristine@shaw.ca to RSVP - I can't wait to get together!

Thursday, August 23, 2012

Here is a review of the Cricut Artiste Cartridge. Remember - place your order for your Cricut collection direct from me and receive a free paper packet of your choice! Here are the packets you can choose from:
Avonlea - X7155B
Clementine - X7156B
Dakota - X7157B
La Belle Vie - X7158B
Scholastic - X7159B
Flirty - X7160B
Moonlight - X7161B
Pear & Partridge - X7162
Stella - X7147B
Pemberley - X7148B
Victory - X7150B
Florentine - X7153B

Email me TODAY!!

Wednesday, August 22, 2012

August Sign Up Bonus - Its Sooo Darn Cute!!

Joining in August Is in the Bag!
Join Close To My Heart in August and get a darling Damask Tote Bag free!


When you become a new Consultant in August, you
will receive a FREE Damask Tote Bag (retail value $50),
while supplies last. This handy, attractive tote with the
Close To My Heart logo lets everyone know you are
a Close To My Heart Independent Consultant—with
class and style! Choose the $49 New Consultant
Essentials Kit or the $99 Master Kit which includes
more supplies and tools, and we will send you a tote
bag free—only in August and only while supplies last.

Here is a peek at the Essentials Kit - $49


And for $99 you get the above items PLUS these:

Offer available August 1–31, 2012, while supplies last. No tax
or shipping/handling is charged on the Damask Tote Bag. Tax
and shipping/handling is charged based on the price of the New
Consultant Kit that is purchased ($49 or $99).

Call or email me today to get yours.


Thursday, August 16, 2012

Hot August Special

I have decided to run a personal special. A personal special is one where I provide the bonus if you order directly through me - not my online shopping site.

My Special just for YOU:
Purchase either the new Cricut Artiste Collection (Z1790) or the Cricut Art Philosophy Collection (Z1686) and receive a free Paper Packet of your choice.

About the Cricut Art Philosophy Collection (Z1686):
Create handcrafted artwork in a snap with our Cricut®
Art Philosophy cartridge! Simply plug the cartridge into your
Cricut®* Personal Electronic Cutter machine (sold at retail stores)
and you’re ready to cut any of the 700 shapes, ranging from elegant
rosettes and lace to trendy gift boxes and banners! You’ll also
receive three My Acrylix® D-size stamp sets as well as three sets
of 9" × 12" Dimensional Elements that work in tandem with the
cartridge. On top of that, numerous My Acrylix stamp sets in the
Idea Book pair wonderfully with images on the Cricut® cartridge.
Cricut® Art Philosophy Collection Includes:
1 – Cartridge (700 images: Font, Shapes, and 3-D items)
3 – Coordinating My Acrylix® D-size Stamp Sets
3 – Coordinating 9" * 12" Dimensional Elements
Sheets (Tags, Mixed Shapes, Banners
Contact me today to get the entire collection for just $99!


About the Cricut Artiste Collection (Z1790):

The new Cricut® Artiste collection takes your
creativity over the top! With 700 images, the
cartridge features themed projects, interactive
cards, awards, and more. From robots and spooks
to weddings and Valentines, your cupcake liners,
invitations, and party favors will coordinate and
quickly come together for any celebration! Cutting
and assembling the numerous 3-D items is a snap
using the project reference chart and separate, stepby-
step assembly booklet.
When you purchase the Cricut® Artiste collection,
you’ll get three coordinating exclusive stamp
sets and three Dimensional Elements 12"μ 9" sheets
that will help your artwork come to life, transforming
the ordinary into amazing!
Contact me today to get the entire collection—
with a retail value of nearly $125—for just $99!
Cricut® Artiste Collection Includes:
1 – Cartridge (700 images: Themed Projects,
Cards, Font, 3-D Items)
3 – My Acrylix® D-size Stamp Sets
3 – Coordinating 12" x 9" Dimensional Elements
Sheets (Awards, Quotes, Album Pages)
$99 (Retail value of nearly $125!)

You will also qualify to get the National Stamping Month Double Stamp set for $5


AND


the August 2012 Stamp of the Month (S1208 - Baroque Borders) for $5


Contact me to place your order today.
You can reach me at mizzchristine@shaw.ca
or
call me at 780-307-9379

Tuesday, July 17, 2012

Special Deal and Contest

Ok, so the new Fall/Winter 2012 CTMH Idea Book will be going live August 1st and I know you are all itching to get your hands on it!!

However there are a couple things you need to know before the Spring/Summer 2012 Idea Book gets tucked away for future reference.
A. Many colors are retiring. Here is the retiring list:
     Holiday Red
     Tulip
     Sunflower
     Sunkiss Yellow
     Key Lime
     Garden Green
     Dutch Blue
     Heavenly Blue
     Moonstruck
     Spring Iris
     Lilac Mist
     Amethyst
     Petal
     Pansy Purple
     Vineyard Berry
     Garnet
     Brown Bag
     Vanilla Cream
     Parchment
     Taffy
     Baby Pink
     Grey Flannel
     Grey Wool
Once these are gone they are gone so get stocked up now. Don't forget to get reinkers for your ink pads.

B. All current markers are being retired to make way for the new alcohol based markers! Although very exciting news for those of us who love to color and shade, the new markers will not work for inking your stamps! Stock up on all the current colors so that you will always have versatility for inking your stamps.

I've decided to run a special and a contest to help you get stocked up and also save on your first order out of the upcoming Idea Book.

 Here is how it works:
1. Qualifying orders are from the current Spring/Summer 2012 Idea Book only.
2. Qualifying order amounts are before s&h and taxes and must be paid in full.
3. Coupons are valid towards August 2012 orders.
4. Every $50 order will receive 2 sheets of retiring cardstock and a 5% off coupon.
5. Every $75 order will receive 3 sheets of retiring cardstock and a 5% off coupon
6. Every $100 order will receive 4 sheets of retiring cardstock and a 5% off coupon.
7. Every $125 order will receive 4 sheets of retiring cardstock, a marker and a 5% off coupon.
8. THE CONTEST: The largest order will receive 4 sheets of retiring cardstock, 2 markers and a 10% off coupon.


Special and Contest starts today and ends July 27, 2012
This is my own special and contest so email me directly with your orders at mizzchristine@shaw.ca.
Online orders do not qualify for this special.

Thursday, April 5, 2012

Happy Easter Snow Bunny!

So I spent the morning crafting and completed my version of the 2012 CTMH Idea Book cover.

I changed up the sentiment as I discovered this morning how easy the Cricut machine and our wonderful Art Philosophy cartridge is to use. I have had a Cricut for many years but haven't really used it. Now I am in love!!!


Many of our clear MyAcrylix stamps fit perfectly into the shapes that can be cut. This cartridge contains over 700 images. Can you tell what I'm going to be playing with for the next few weeks, maybe months?

After a morning of fun crafting, my daughter, Robyn and I had to stretch our legs. Look at the fruits of our spring storm labour.


Happy Easter Everyone!!!

Westlock, Alberta Snow Day

For once, the weatherman was right on the money with this early spring storm forecast. Currently, the highways north of Edmonton are in horrific shape and my employer has declared a Snow Day!

Here's a peek outside my front door. Yesterday, I could see my front lawn and I was planning my new flower bed placement. This morning I see potential snowman space!


Yesterday, my back yard was completely free of snow and visions of vegetable garden improvements were dancing in my head. This morning you can't tell there is a plot beside the garage.


My handrail is my snow gauge. It is 1 1/2 inches high and as you can see the snow is at least twice the height as the wood so we are at approximately 3 inches of accumulation.


Currently, the snow is continuing at a steady rate with very large wet and fluffy flakes! I believe we will get the 6 to 10 inches that was forecast last night.


Wednesday, April 4, 2012

Monday, April 2, 2012

National Scrapbooking Month

April is National Scrapbooking Month and we have a fantastic paper packet just for you!!

Take a peek at this package:


Dotty for You includes 24 specially designed, coordinating B&T Duos® sheets (2 each of 12 patterns) and an artwork idea insert to get your creative juices flowing. 

When you place an order of $35 or more in products from the Spring/Summer 2012 Idea Book between April 17 and May 31, you may add the Dotty for You paper packet, valued at $19.95, for just $5. 

But that’s not all! There are two ways you can get this darling paper packet FREE!

Hostesses will receive a free Dotty for You paper packet when their Gathering sales total $400 or more (excluding tax, shipping/handling, and Operation Smile donations).

New Consultants who sign up between April 1 and May 31 (two full months!) will receive a free Dotty for You paper packet with their kit.

Sunday, April 1, 2012

Gift Card Holder Instructions

OK, well I didn't get 5 comments however I want to share these instructions with you anyways!

1. Cut 1 piece of transparency at 4 1/4" x 10 1/2". This is the viewing window.
2. Cut 2 pieces of card stock at 2" x 5". These are your base and cover.
3. Score the transparency at 1/2", 1 1/2", 5 1/2" and 6 1/2" as shown below.

4. Score both card stock pieces at 1/2" on all four sides. Cut in on the scoreline to the intersecting score line to create flaps. Snip out small wedges to make assembly easier.

5. Use a piece of sticky tape along the small edge of the transparency and attache to the long edge. Viewing window is now assembled.

 6. Make a slit in the center of the base the length of your gift card. I used my scoring board to make the cut with a finger knife to ensure the slit was centered.

7. Assemble base and cover by gluing the flaps in.

8. Run adhesive around the sides of the base. Insert into the bottom of the viewing window and press edges to make sure the base is secure to the window.
9. Slide the gift card up from the bottom through the slit. You may have to fiddle around a bit to make it stand the way you want it to. The slit is tight and will hold the card securely.

10. Squeeze the top edges in and place the cover on top. I didn't add extra length or width to the top as the transparency pushes gently holding the top on without having to secure it with anything else. It's a snug fit to ensure the cover stays on.

You are now ready to put the finishing touches on. In my sample I added wide scalloped lace around the edge of the cover. Then I ran a length of ribbon over the lace and added a bow. I finished it off by making a tag and attaching it with some hemp and a safety pin.

Happy Paper Crafting!!!