Monday, July 12, 2010

Hinged Box Tutorial Part 3

OK! We are on the last stage of construction. Today we are going to complete the inside pockets, add a handle and a closure.

Inside Pockets
Cut 2 pieces of cardstock at 8.5" x 3".

Score 3 sides 0.5" in then score another 0.5" in.

Cut off marked corners and cut a slit on the remaining squares to make 2 flaps. Fold in along score lines.

Adhere the flaps first then the outside pieces to form a box shape. I used liquid glass as my glue so I also used my bone folder to slide down in and make sure that the flaps were sitting flat inside the box.

Adhere both pockets to the inside of your box, one on either side.

Handle
This stage is really up to you. I created an optional briefcase handle.
*You could also use ribbon to create a purse handle. Cut 2 pieces of ribbon equal lengths. Add eyelets to both ends of each side of your box. Insert the ribbon tying a knot on the inside to hold it in place.*

Cut 1 piece of cardstock 8.5" x 2".
Score the 2 long ends at 0.5". Score the 2 short ends at 1".

Fold in the long sides making sure to use your bone folder to go over the crease several times. Then take the piece and start training it to curve. I put it over 2 fingers on my left hand and pulled it through. This is what makes the curve in your handle. You could also run the strip over the edge of your table. Sorry I didn't explain this very well.

Now fold each short end up towards the curved part at the 1" score. This provides a flat base to attach your handle to your case.

Attach your handle to the top of your case. Center the handle evenly over both sides but only adhere it to one of the sides. Use strong adhesive. I also added a brad to each side for extra strength.

Closure
I chose to use one center closure but you could do 2 to make this look like a true briefcase.
Cut 1 piece at 3" x 1".

Attach this piece in the center between the handles making sure your adhesive is only on one side of the case.

 I used Velcro dots to complete the closure. I centered the first dot on the closure then added the second side of the dot right over top of the first one. Then I pressed down the closure onto the side of the case. This ensured that both sides of the Velcro dots were lined up perfectly. I opened up the closure then applied pressure from the inside of the case to ensure the dots adhered properly.

Yuk! Wrinkled fingers! Well I guess you can tell I've washed a load or two of dishes in my day!

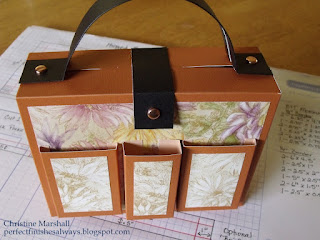
Viola!!! Your case is complete!!

Here is my sample case.


A couple of things I've learned along the way:
Cut all your cardstock and B&T pieces out first.
Score all your cardstock and adhere your B&T pieces before folding and adhereing the different components.
It makes adding the B&T much easier.

Now here is the revised main plan for this project. It has the corrected front side pocket measurements and includes sizing charts for your patterned paper.


Thank you for joining me in this tutorial! I'd like to hear your comments and suggestions - please leave one.
I'd also love to see your creations!!

Leave a comment with a link to your hinged box project. I will post all your links in a separate category so that all can share in this creative outlet.

Happy Paper Crafting!!!

Saturday, July 10, 2010

Last Convention Update

Sorry I don't really have much for you. I'm still trying to glean info from multiple sources.

An error I made - July Constant Campaign is for Studio J for consultants only. The Mini Album Campaign is for August/September.

Paper Pack Colors:
Magnifique paper pack - includes chocolate, lagoon, pacifica, sky - all blues, lagoon has green tint.
Olivia paper pack - Barn red, Pear, Smoothies, and Sunset
Hooligans paper pack - Gypsy, lagoon, pear and sunset
Mistletoe - cocoa, cranberry, garden green and new england ivy

Faux Leather Albums:

12 x 12 Flip Flaps
These flip up and down from the middle and come in 4, 6 and 8" widths

There are many many changes to Studio J, Online Ordering, Credit Card Processing. Most of the information for this is getting posted on the CTMH website in the FAQ section.

Hinged Box Tutorial Part 2

OK, we are now moving on to the outside pockets today. In working with my first design I did find some measurement errors so please note the corrected measurements for the front pockets. I will repost a complete sheet once we are done the construction phase.

Back and Front Pockets

Back Pocket - Cut 1 at 7.5" x 4"
Center Front Pocket - Cut 1 at 3.5" x 4" (size change from original drawing)
Side Front Pockets - Cut 2 at 3.25" x 3.5" (size change from original drawing)

For the back and center front panels core 3 sides 1/2" in then another 1/2" in from your first score as shown below. 


Cut away 3 marked corners. Snip in the last remaining square to create a flap. Fold on scores.


Adhere the flaps first then the outside corners. I used my scoring tool to apply pressure from the inside to make a good bond as I was again using CTMH Liquid Glass. Did I tell you how much I love that stuff?

Since the back and center pockets are deeper they were scored at the 1/2" marks. The back is meant to hold more cards or a small notepad and the front center is to hold pens.

Your next two pieces are the side front pockets. They are not as deep so they are scored at the 1/4" mark.
Proceed with the cutting, folding and adhering of these 2 pockets as you did above.

Cover the outside of the back and front of the hinged box and each pocket front with patterned paper then you can adhere the pockets in position. The samples below only show the placement of the pockets before covering with patterned paper. I will post my covered box in the next installment of this tutorial.


Part 3 will be creating inner pockets, a handle and a closure for your hinged box.

Again I hope you have enjoyed this tutorial and feel free to copy the instructions and pictures for your own use - whatever that may be.

Friday, July 9, 2010

July Constant Campaign

Some sketchy details are slipping out! It looks like our July campaign will be mini album kits!

Day 2 of Convention Starts

Chocolate Work In Progress Album

Hinged Box Tutorial Part 1

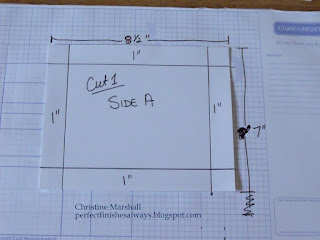
Good Morning! As promised I have a special tutorial for you. I will be doing this in several parts. The first picture shows the cutting/scoring diagram for all the parts.


Today we will be working on the basic hinged box. 
First you will need 2 pieces of heavy cardstock.
      Side A - Cut 1 at 8.5" x 7"
      Side B - Cut 1 at 8.5" x 8" - hinged side
These 2 pieces are what you are going to make the basic box with.

Score Side A  at 1" in on all four sides. This will make the box 1" deep'

Snip one side on each of the corners to the 1" score mark to create flaps for your box.
Fold each side inwards to create your sides. Adhere each of the flaps using a strong adhesive. I used CTMH Liquid Glass. I just love that stuff! You cannot imagine the things I have repaired in my house using this product.

Set this piece aside. We will now build the other half of the box with the hinge.
Again, score the piece 1" in on each side.
To create the hinge, you need to make a second 1" score line.
With the 8" side against the top of your scoring tool, score 2" in from the right side.
See the diagram below to see where to score this mark - sorry I'm hoping I explain this correctly!

Cut off the 2 square corners at the first score line. This becomes your hinge to join the 2 boxes together.

Again snip each corner to create flaps. Fold all your sides in making sure to use a mountain fold for your hinge. This piece will slide into Side A to complete the hinge. Adhere all the flaps. Your second side is now ready to join to the first one.

Place the two sides back to back and slide the hinge from Side B into Side A. Adhere with strong adhesive.

VIOLA!!! You now have a hinged box!! Easy Peasy!!


Tomorrow we will work on all the pockets and the closure.

I hope you have enjoyed this tutorial. Please feel free to email me with any questions you may have.

** Paper crafts are meant to be enjoyable for all who choose this craft. I do not have a patent or copyright for building boxes. Feel free to copy this tutorial and share with others as you wish. Happy Paper Crafting! **

Thursday, July 8, 2010

2 More Stamp Sets

November and December Stamp of the Month

3 More Stamp Sets

September and October SOTM...


The Present .....

2 New Stamp Sets

Unity...
  
Circle of Love...

Opaques

Opaques Mocha!

Another Paper Pack

Mistletoe!!

2nd New WOTG

Introducing.......Magnifique!

Other New Items

Sorry I have no pics of these yet:

12x12 Flip Flaps
Round Card Bases in Col. White and Daisy White
Mix & Mingle 4" Mini-album - 3 acrylic and 5 chipboard pages
New Albums

Opaque pearls - 108 in pk; 4 different sizes

New Paper Pack

Hooligans

Closeup of New Colors

Cover of New Idea Book

Embellishments

Mistletoe


Shimmer Brads


Holigans Stickers


Foundry Flourishes

New Program Book

A new Program Book has been unveiled!!
This new book includes an interactive DVD...WhooHoo

Presenting....Magic

Convention Update

New Colors - an update in the summer colors -
Carnival will have Gypsy, Holiday Red, Pacifica, Sunny Yellow, Sunset and Topiary
Celebration has Dutch Blue, Cotton Candy, Lagoon, Pear, Sky and Smoothies


Looks like the following colors will be retiring:
Clover Meadow   Hydrangea   Orange   Star Spangled Blue
Bubblegum   Citrus Leaf   Ocean   Watermelon

AND....new embellishments!

Key To My Heart Layout Challenge

I've decided to do some catchup work on my layouts. I'm starting at the beginning of Helen Onulyks Scrapbook Challenge and since it is up to 66 now I'm waaaaaaay behind! I love these because they use our program books which are fantastic starting points for your pages.

I used an old Constant Campaign kit called Key To My Heart. I love love love this paper. Here are my layouts for challenges 1, 2, and 3.

Challenge 1 ==> Cherish Abstract Pg 66-67


I used machine stitching on the 2 small cross pieces and a couple of elements from Heartfelt Whimsy.

Challenge 2 ==> Imagine Memoirs Complete Pg 66-67


Again I played with  my sewing machine and used some decorative stitching on either side of the cross pieces at the bottom of the layout. The ribbon, paper clips, and brads are from the Connections Club mini Black assortment pack.

Challenge 3 ==> Cherish Now and Then Pg 100-101


I used 4 Pewter photo holders and a combination of 2 types of sassy strands to outline the frame on the LHS page.

Stay tuned for more layouts and my second tutorial! The tutorial is on how to build a basic hinged box. This can then be used for a variety of projects such as a paper suitcase or purse-type tote.

Wednesday, July 7, 2010

New WOTG - Olivia

Here is a look at the new Workshop on the Go - Olivia.

 Isn't she beautiful? New colors are Pear, Smoothie, and Sunset.

Pssst...those round circles in the package are brads!!! 

Convention Has Started!

Good Morning Everyone.
The CTMH annual convention has officially stated in Washington, DC and I have a couple rumored updates to share with you.

A. Our Idea Book will be switching from 3 times a year to twice a year starting in February 2011. Word on the street is that it will be bigger and better with 24 more pages being added AND cost less!!

B. Studio J is introducing "Snapshot". This is an application that can be used on an I-phone/I-pod to show off your creations anywhere.

I will keep you all posted here as I get more news!

Don't forget - Virtual Convention starts tomorrow! Join in the fun!

Monday, July 5, 2010

Stamp of the Month - July


Isn't he just the most adorable creature!!! Contact me today to get yours.