Inside Pockets
Cut 2 pieces of cardstock at 8.5" x 3".Score 3 sides 0.5" in then score another 0.5" in.
Cut off marked corners and cut a slit on the remaining squares to make 2 flaps. Fold in along score lines.
Adhere the flaps first then the outside pieces to form a box shape. I used liquid glass as my glue so I also used my bone folder to slide down in and make sure that the flaps were sitting flat inside the box.
Adhere both pockets to the inside of your box, one on either side.
Handle
This stage is really up to you. I created an optional briefcase handle.
*You could also use ribbon to create a purse handle. Cut 2 pieces of ribbon equal lengths. Add eyelets to both ends of each side of your box. Insert the ribbon tying a knot on the inside to hold it in place.*
Cut 1 piece of cardstock 8.5" x 2".
Score the 2 long ends at 0.5". Score the 2 short ends at 1".
Fold in the long sides making sure to use your bone folder to go over the crease several times. Then take the piece and start training it to curve. I put it over 2 fingers on my left hand and pulled it through. This is what makes the curve in your handle. You could also run the strip over the edge of your table. Sorry I didn't explain this very well.
Now fold each short end up towards the curved part at the 1" score. This provides a flat base to attach your handle to your case.
Attach your handle to the top of your case. Center the handle evenly over both sides but only adhere it to one of the sides. Use strong adhesive. I also added a brad to each side for extra strength.
Closure
I chose to use one center closure but you could do 2 to make this look like a true briefcase.Cut 1 piece at 3" x 1".
Attach this piece in the center between the handles making sure your adhesive is only on one side of the case.
I used Velcro dots to complete the closure. I centered the first dot on the closure then added the second side of the dot right over top of the first one. Then I pressed down the closure onto the side of the case. This ensured that both sides of the Velcro dots were lined up perfectly. I opened up the closure then applied pressure from the inside of the case to ensure the dots adhered properly.
Yuk! Wrinkled fingers! Well I guess you can tell I've washed a load or two of dishes in my day!
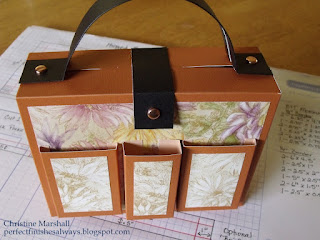
Viola!!! Your case is complete!!
Here is my sample case.
A couple of things I've learned along the way:
Cut all your cardstock and B&T pieces out first.
Score all your cardstock and adhere your B&T pieces before folding and adhereing the different components.
It makes adding the B&T much easier.
Now here is the revised main plan for this project. It has the corrected front side pocket measurements and includes sizing charts for your patterned paper.
Thank you for joining me in this tutorial! I'd like to hear your comments and suggestions - please leave one.
I'd also love to see your creations!!
Leave a comment with a link to your hinged box project. I will post all your links in a separate category so that all can share in this creative outlet.
Happy Paper Crafting!!!


Thanks for being so kind in sharing this awesome tutorial with us.
ReplyDeleteA Consultant share your site last night in our Unit Business Meeting and everybody was deligthed. Love it!!!